Pages

Monday, August 30, 2010

Thanks For Sharing!

Here are some highlights from this weekend's Saturday Spotlight!


Backpack tag from Handmade Happiness!


Dainty Rosette Headband from Simply Crafting...I could never get sick of headband ideas!


Chalkboard stones! They're beautiful and so much fun!


Thanks again for sharing. Be sure to grab a button

post signature

Saturday, August 28, 2010

Saturday Spotlight #18

Welcome to another Saturday Spotlight linky party!


1) First, create a blog entry about something you made yourself. Post our Saturday Spotlight button under your post or somewhere on your blog so that others can find all of your awesome links at Saturday Spotlight. Our linky party button is on the right side of our blog. Just copy the html code to the bottom of your blog post. If you would like to keep it somewhere else on your blog where others can see it, that's also ok.
2) Next, add your blog post name down below and then add the link of the blog entry about your project (not your homepage) . To get your link, click on the title of your blog post that you would like to enter and then copy the address that appears in the address bar up top, and paste it down below. It should look about like this: http://yourblogname.blogspot.com/2009/07/your_project.html.

3) Have fun checking out all the awesome projects!

Tuesday, August 24, 2010

Bride and Groom Strawberries

Yesterday was my three year anniversary of marriage so I one thing we did to celebrate was this...

I made little bride and groom dipped strawberries! The brides didn't turn out very well on most of the peices so I ended up just putting some more milk chocolate on them in zig zags. It's harder than it looks! but I learned something...
Add a small scoop of shortening to make the chocolate a little thinner. It looks less bulky and more smooth when they're finished.


I got to use my new three tiered dessert stand from CSN.com stores and I loved it! One thing that surprised me was that I thought it was glass, but it's actually made of acrylic. It's actually a good thing since things seem to get broken around here. Another thing I love about it is that the peices are each separate so you can display them however you wish. I chose the neat stacked look mostly because I didn't have enough strawberries to fill each tier up. Thanks CSN, it's a great peice!

Monday, August 23, 2010

Thanks for Sharing!

Here are some of my favorites from this weekend!

From Sister 4 Say, More is More, we have this chocolate flower necklace!
I know! It's amazing!

And this Sun Hat is just gorgeous from Da Perfect Mix.

This lamp redo is awesome--she just used twine! From Where Beauty Meets Function.

Thanks again, you guys are so talented! 
Be sure to grab a featured button!


Saturday, August 21, 2010

Saturday Spotlight #17

Welcome to another Saturday Spotlight linky party!


1) First, create a blog entry about something you made yourself. Post our Saturday Spotlight button under your post or somewhere on your blog so that others can find all of your awesome links at Saturday Spotlight. Our linky party button is on the right side of our blog. Just copy the html code to the bottom of your blog post. If you would like to keep it somewhere else on your blog where others can see it, that's also ok.
2) Next, add your blog post name down below and then add the link of the blog entry about your project (not your homepage) . To get your link, click on the title of your blog post that you would like to enter and then copy the address that appears in the address bar up top, and paste it down below. It should look about like this: http://yourblogname.blogspot.com/2009/07/your_project.html.

3) Have fun checking out all the awesome projects!

Friday, August 20, 2010

Find me...

Hey Friends--

You can find me over at Ucreate today! I have a new tutorial that hasn't even been posted at Craft Envy yet, so come on over and check it out!


Thursday, August 19, 2010

Fabric Flower Wreath

This kinda seems like a Valentines wreath to me, I must have been in a lovey dovey mood when I made it
..
What you will need: 
-10 strips of fabric 1.5"x 15 " each
-piece of fabric to cover the wreath
-black ribbon
hot glue

1. Start by cutting or tearing strips of fabric out for your flowers.

2. Twist the fabric as you roll it up for the flowers. This will make them more believable.


3. Roll up the fabric keeping the twists in the fabric.

4. Your flowers should start to look like this. Continue to make 10 of these.

5. Cover your styrofoam wreath with fabric leaving loose folds to give an elegant look.

6. Wrap some black ribbon around the wreath, leaving the folds in the fabric.

7. Hot glue your flowers on tightly together. Place a bow above the flowers!
Now you have a "Valentines in August Wreath"!

Wednesday, August 18, 2010

Fabulous Friends Wednesday: Cute As A Fox

Welcome to another Fabulous Friends Wednesday!

Hi Craft Envy readers! I'm Ashley from over at Cute as a Fox Creations. Today we are making some awesome no-sew ribbon rosettes. Before we get started I wanted to let you know about this project I am working on right now. I am raising money so my sister can participate in the Susan G Komen 3 Day for the Cure. As a thank you for anyone who donates $15 or more, I will send you a breast cancer awareness necklace or key-chain. Click on the button to learn all about the project.
Now to make some pretties! Cute as a FoxThe other day I sat down to make a ribbon rosette and discovered my ribbon was wired. I thought I was done for, but as I started playing around I figured out I could make a no-sew rosette. Yippee! NOTE: Click on any of the pictures to enlarge them.
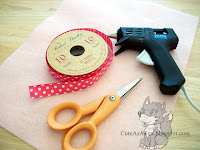
Here is what you need:
Cute as a Fox
  • Wired edge ribbon - 1/2 inch to 1 inch will probably work best
  • Felt - enough to get two, 2" circles
  • Scissors
  • Glue gun and glue
Here's what you do:
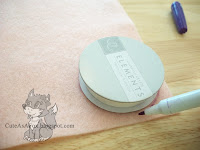
Step 1: Cut out two, 2" circles. I traced an old spool of ribbon.
Cute as a Fox
Step 2: Cut about 5 feet of ribbon. You will probably end up with extra, but I'm always paranoid I will run short. On one end, pull out a little bit of the wire and fold it over. This will keep the wire from pulling through the ribbon when you start to gather it.
Step 3: On the other end of the ribbon start pulling on the bottom wire. IMPORTANT: Make SURE the side of ribbon you kinked back in step 2, is the same side you're pulling on here. If you start pulling on both sides(I.E. the top and the bottom), things get crazy later on.
Gather the whole ribbon by pulling the wire one direction and the ribbon the other direction. You can "push" the gathered part farther down the ribbon and that is how the gather gets all the way through the ribbon.
Step 4: Fold the end of the ribbon down so that the raw edge of the ribbon is down.
Step 5: Glue the ribbon down on the edge of your felt. Glue the ribbon around the outside of the whole circle. Going about an inch at a time. As you go, you can either gather the ribbon more to add extra ruffle or pull it out, if the gather is too tight.
Step 6: Continue gluing around the circle in a spiral pattern.
Step 7: When you reach the center of the flower, cut off about 2 inches so you can make the center of the flower.
Step 8: Fold the raw edge down, same as you did at the beginning of a flower. Put the raw edge down and "squish" the rest down. Not too specific I know, but good news is that almost anything looks good. The other good thing is that the wire in the ribbon will keep it in place so you can play with it until you like it. After you get it all set, lift it up slightly and put a dab of glue underneath to keep it all in place.
Step 9: You can stop there or continue on to make the headband. I used a metal headband, some 1/8" ribbon and the rosette.
Step 10: Heat seal or fray check the end of the ribbon and glue the ribbon on small sections at a time.
Step 11: Figure out where you want the rosette placed on the headband and glue it on. I didn't get a picture of the next step, but you glue on the second felt circle to keep the rosette in place.
Voila! You are done. You might be able to get one done in the time it takes you to read the tutorial. These are super fast and easy.
I did a small variation and did three rosettes. I love it with the yellow pleated ribbon. Thanks for having me Nicholette and Vanessa!

Monday, August 16, 2010

Thanks For Sharing!

Here are some of my favorites from this weekend! 

This button ring is so elegant and yet so simple to make!


This little bench redo is lovely. 


Conversation coasters. Genius!


Thanks for linking up, and be sure to grab a featured button!

Friday, August 13, 2010

Saturday Spotlight #16

Welcome to another Saturday Spotlight linky party!


1) First, create a blog entry about something you made yourself. Post our Saturday Spotlight button under your post or somewhere on your blog so that others can find all of your awesome links at Saturday Spotlight. Our linky party button is on the right side of our blog. Just copy the html code to the bottom of your blog post. If you would like to keep it somewhere else on your blog where others can see it, that's also ok.
2) Next, add your blog post name down below and then add the link of the blog entry about your project (not your homepage) . To get your link, click on the title of your blog post that you would like to enter and then copy the address that appears in the address bar up top, and paste it down below. It should look about like this: http://yourblogname.blogspot.com/2009/07/your_project.html.

3) Have fun checking out all the awesome projects!

Wednesday, August 11, 2010

Coming Up-- CSN Review

It's almost time for a product review courtesy of CSN stores! If you haven't been there, get yer booty on over!

I just have to say... CSN has some of the most trendy items including dining room furniture, decor, and ANYTHING you can imagine for your kitchen! With more than 200 stores, there truly is something for every type of taste. That's what I love most.

Can't wait to get something awesome...what will I get...


Tuesday, August 10, 2010

Monogram and Metal Wreath

I found this metal...thingy at a thrift store around January and it's just been sitting around since. The other day I was at Rod Works and they had vinyl monogram letters and THE VISION came!


 This was literally a five minute craft...
I stuck the vinyl on the wall put a ribbon on my hunk a metal and nailed it to the wall.
Voila!