Monday, September 26, 2011

Homemade Sun-Dried Tomatoes

So hear me out. Sun-dried tomatoes at the store are SO EXPENSIVE! I have never bought them on my dollar because of it. Recently, I learned how to make them on my own, using free-energy (my car). Check it out.


What you will need:
-Roma tomatoes (they are the meatiest and have less juices and gooey stuff)
-A cookie sheet with four sides
-A car (or oven, but that's not free energy)


1. First of all, clean your tomatoes and dry them off. Then, slice them into thin wedges, discarding the squishy insides and seeds, and leaving only the meaty flesh. Place the tomatoes on your cookie sheet.


 3. Put your cookie sheet in your car on a warm day where your tomatoes can get lots of sunshine! This process may take up to two days depending on how warm it is outside. Or, if you'd like to finish it over night in the oven, just turn your oven to the lowest possible setting, but you might wanna watch it. I think an ideal temperature would be close to what the inside car temp is. Maybe the 120-130s.

 3. I like to store my sundried tomatoes in olive oil in the fridge. They will keep for months that way.


Make something YUMMY!
I made this yummy sun-dried tomato and chicken alfredo pasta!

Read more

Friday, September 16, 2011

Saturday Spotlight #62

 Welcome to Saturday Spotlight! This week I made fashion rings from Accent Gems!


Let's see what you've been up to!


RULES:

1) First, create a blog entry about something you made yourself. Post our Saturday Spotlight button under your post or somewhere on your blog so that others can find all of your awesome links at Saturday Spotlight. Our linky party button is on the right side of our blog. Just copy the html code to the bottom of your blog post. If you would like to keep it somewhere else on your blog where others can see it, that's also ok.
2) Next, add your blog post name down below and then add the link of the blog entry about your project (not your homepage) . To get your link, click on the title of your blog post that you would like to enter and then copy the address that appears in the address bar up top, and paste it down below. It should look about like this: http://yourblogname.blogspot.com/2009/07/your_project.html.


Read more

Monday, September 12, 2011

Accent Gem Rings

I got some of these little glass "flat marbles" as I call them (I guess they're really "accent gems"), at the dollar store. You can get just clear, or you can get a mix of colors. I got the one with colors. But the clear ones did seem more versatile, for sure.

What you will need:
-rings with a flat top (so you can glue the gem on)
-accent gems
-paper, such as scrapbook paper or newspaper
-super glue (you can use glass glaze too)


1. Apply your glue to the back of your accent gem, lay a peice of decorative paper on so pattern is touching the glue.

2. After that dries, apply glue to the entire back of the paper, (this will help water proof it), and then stick your ring on!


I loved the newspaper ring! I used a tan colored marble to add an antique look.
For the rose ring, I used a light pink marble.


Monday: Sew Can Do, Graphics FairyMad In Crafts, It's So Very Cheri, Skip To My Lou, The Girl Creative,  DIY Showoff, Making The World Cuter,  Sumo's Sweet Stuff, Keeping It Simple, Trendy Treehouse, 
Tuesday: Sweet Floweret, Hope Studios,

Wednesday: Sugar BeeSilly Little Sparrow, Today's Creative Blog,  
Thursday:Someday CraftsThe Thrifty Home
Friday:Beyond The Picket Fence, Train To Crazy733Shabby CottageFireflies and Jellybeans, Somewhat Simple, Thirty Handmade DaysShabby Nest, 
Hodgepodge FridayFun To CraftTidy Mom, Finding Fabulous, Fingerprints on the FridgeSimply Sweet Home, 
Chic On a Shoe StringKojo Designs.
Saturday: Show and Tell I Am Only One Woman, The Hungry Hippo, Funky Junk Interiors, Saturday Spotlight @ Craft Envy.  
Read more

Thanks For Sharing!

I had so much fun looking at all the awesome crafts this week! 

Here were some of my favorites!
Talk about cute! I'm loving this button pumpkin!


A girls rock party! I'm going to have to remember this idea!


This wreath was inspired from one of my tutorials!

Be sure to grab a featured button!
Read more

Friday, September 9, 2011

Saturday Spotlight #61

Thanks for joining the Saturday Spotlight link up party! This week I shared bread making with Challah Dough. Check it out!
 
 
Let's see what you've been up to!


RULES:

1) First, create a blog entry about something you made yourself. Post our Saturday Spotlight button under your post or somewhere on your blog so that others can find all of your awesome links at Saturday Spotlight. Our linky party button is on the right side of our blog. Just copy the html code to the bottom of your blog post. If you would like to keep it somewhere else on your blog where others can see it, that's also ok.
2) Next, add your blog post name down below and then add the link of the blog entry about your project (not your homepage) . To get your link, click on the title of your blog post that you would like to enter and then copy the address that appears in the address bar up top, and paste it down below. It should look about like this: http://yourblogname.blogspot.com/2009/07/your_project.html.


Read more

Tuesday, September 6, 2011

Fun With Challah Dough!

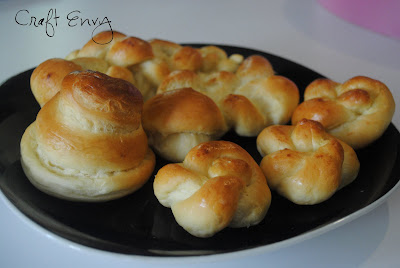
I have been trying lots of new recipes lately and one of my recent favorites is Challah dough! It is extremely easy to work with so you can make lots of fun shapes. I used the recipe and roll formations from a book called Secrets of a Jewish Baker.

These would make for impressive rolls during holiday meals or when guests are over for dinner!

Read more

Friday, September 2, 2011

Saturday Spotlight #60

Welcome to the Saturday Spotlight link up party! This week I shared my Housework Organization Cards and my Newspaper Nails

Let's see what you've been up to!


RULES:

1) First, create a blog entry about something you made yourself. Post our Saturday Spotlight button under your post or somewhere on your blog so that others can find all of your awesome links at Saturday Spotlight. Our linky party button is on the right side of our blog. Just copy the html code to the bottom of your blog post. If you would like to keep it somewhere else on your blog where others can see it, that's also ok.
2) Next, add your blog post name down below and then add the link of the blog entry about your project (not your homepage) . To get your link, click on the title of your blog post that you would like to enter and then copy the address that appears in the address bar up top, and paste it down below. It should look about like this: http://yourblogname.blogspot.com/2009/07/your_project.html.


Read more

Thursday, September 1, 2011

Newspaper Nails


I have been dying to do this ever since I saw it on someone's Pinterest! After I did it, I totally wanted to redo it, because you kinda have to do it one time to get the hang of it. So I KNEW I could do it better the next time. But I have two very small children who barely allow me to get ready in the morning...so one shot is all get :)

What you will need:
~Light or bright color of nail polish (I chose Vintage Blue from Avon)
~Clear polish
~Rubbing alcohol (or I've heard other types also work :)
~Bowl
~Ten pieces of cut out newspaper with print


1. Cut out ten one by one inch pieces of newspaper. Make sure they have print on them :)


2. Paint your nails and allow them to dry fully.


3. Dip your newspaper clips in alcohol and press onto each nail for about 15 seconds holding very still.


4. Paint a coat of clear overtop to preserve the print. (Put a lot on your nail brush or it will smear the ink. I learned that the hard way).


Read more

LinkWithin

Related Posts with Thumbnails