Welcome to another Fabulous Friends Wednesday!
Hi Craft Envy readers! I'm Ashley from over at
Cute as a Fox Creations. Today we are making some awesome no-sew ribbon rosettes. Before we get started I wanted to let you know about this project I am working on right now. I am raising money so my sister can participate in the
Susan G Komen 3 Day for the Cure. As a thank you for anyone who donates $15 or more, I will send you a breast cancer awareness necklace or key-chain. Click on the button to learn all about the project.
Now to make some pretties!

The other day I sat down to make a ribbon rosette and discovered my ribbon was wired. I thought I was done for, but as I started playing around I figured out I could make a no-sew rosette. Yippee!
NOTE: Click on any of the pictures to enlarge them. Here is what you need:
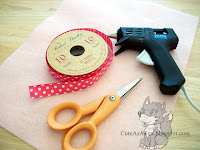
- Wired edge ribbon - 1/2 inch to 1 inch will probably work best
- Felt - enough to get two, 2" circles
- Scissors
- Glue gun and glue
Here's what you do:
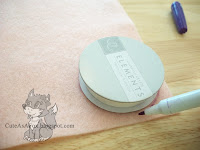
Step 1: Cut out two, 2" circles. I traced an old spool of ribbon.
Step 2: Cut about 5 feet of ribbon. You will probably end up with extra, but I'm always paranoid I will run short. On one end, pull out a little bit of the wire and fold it over. This will keep the wire from pulling through the ribbon when you start to gather it.
Step 3: On the other end of the ribbon start pulling on the bottom wire. IMPORTANT: Make SURE the side of ribbon you kinked back in step 2, is the same side you're pulling on here. If you start pulling on both sides(I.E. the top and the bottom), things get crazy later on.
Gather the whole ribbon by pulling the wire one direction and the ribbon the other direction. You can "push" the gathered part farther down the ribbon and that is how the gather gets all the way through the ribbon.
Step 4: Fold the end of the ribbon down so that the raw edge of the ribbon is down.
Step 5: Glue the ribbon down on the edge of your felt. Glue the ribbon around the outside of the whole circle. Going about an inch at a time. As you go, you can either gather the ribbon more to add extra ruffle or pull it out, if the gather is too tight.
Step 6: Continue gluing around the circle in a spiral pattern.
Step 7: When you reach the center of the flower, cut off about 2 inches so you can make the center of the flower.
Step 8: Fold the raw edge down, same as you did at the beginning of a flower. Put the raw edge down and "squish" the rest down. Not too specific I know, but good news is that almost anything looks good. The other good thing is that the wire in the ribbon will keep it in place so you can play with it until you like it. After you get it all set, lift it up slightly and put a dab of glue underneath to keep it all in place.
Step 9: You can stop there or continue on to make the headband. I used a metal headband, some 1/8" ribbon and the rosette.
Step 10: Heat seal or fray check the end of the ribbon and glue the ribbon on small sections at a time.
Step 11: Figure out where you want the rosette placed on the headband and glue it on. I didn't get a picture of the next step, but you glue on the second felt circle to keep the rosette in place.
Voila! You are done. You might be able to get one done in the time it takes you to read the tutorial. These are super fast and easy.


I did a small variation and did three rosettes. I love it with the yellow pleated ribbon.

Thanks for having me Nicholette and Vanessa!
Read more
 Read more


