Showing posts with label earring tutorial. Show all posts

Tuesday, August 16, 2011

Clay Flower Earrings and a Giveaway!

I found out about these molds from a Saturday Spotlight link a few weeks ago and I KNEW I had to have one! I made some polymer clay earrings from the Chysanthemum mold and I just cant get enough of them.


I loved them so much that I contacted MoldMuse to sponsor a giveaway!

One lucky reader will receive a gift certificate to the MoldMuse Etsy shop to redeem for your very own silicone flower mold!


Rules:
1. Be a Craft Envy Follower.
and 
2. Post a comment below stating what your favorite mold is from MoldMuse.
**Giveaway deadline will be Saturday night at 10 pm.**


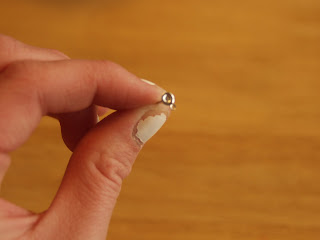
If your interested in how to make the earrings from polymer clay (Michaels), here are some basic instructions:

1. Roll a small ball of clay in your hands and then pressinto the flower mold. Remove excess.
2. Smooth out the back surface. 
3. Bake at 300 degrees in the oven for twenty minutes.
Easy peasy!


Monday: Sew Can Do, Graphics FairyMad In Crafts, It's So Very Cheri, Skip To My Lou, The Girl Creative,  DIY Showoff, Making The World Cuter,  Sumo's Sweet Stuff, Keeping It Simple, Trendy Treehouse, 
Tuesday: Sweet Floweret, Hope Studios,

Wednesday: Sugar BeeSilly Little Sparrow, Today's Creative Blog,  
Thursday:Someday CraftsThe Thrifty Home
Friday:Beyond The Picket Fence, Train To Crazy733Shabby CottageFireflies and Jellybeans, Somewhat Simple, Thirty Handmade DaysShabby Nest, 
Hodgepodge FridayFun To CraftTidy Mom, Finding Fabulous, Fingerprints on the FridgeSimply Sweet Home, 
Chic On a Shoe StringKojo Designs.
Saturday: Show and Tell I Am Only One Woman, The Hungry Hippo, Funky Junk Interiors, Saturday Spotlight @ Craft Envy.  
Read more

Saturday, January 9, 2010

Earring Week: String earrings


These earrings are very fun and very easy to make, and they turned out very cute!

You'll need:
Nylon string ($3.47 at Walmart)
Mod Podge ($6.73 at Walmart for a big bottle, it'll last forever)
Jump rings ($2.99 at Michael's for 140 pieces)
Earring hooks ($2.99 at Michael's for 60 pieces)
Small paintbrush or sponge applicator
Plastic trash bag
Double sided tape
Permanent marker


Trace the size of the circle you'd like to make on your plastic bag.


Put a piece of double sided tape right through the middle of your circle, and use another item to make the center space of your hoop.  I chose a cap from a soda bottle, and stuck it in the center, on top of the double sided tape.


Since I'm using a nylon string, it's a good idea to burn the end of the string so it won't unravel on you before you start winding it.


Start winding your string around the cap, making sure it stays flat, and as you wind it around, apply mod podge to the string.  Be generous when you apply it so each wound part will stick together.


Wrap it around for as long as you want to go, applying mod podge as you go, then let it dry for 5-10 minutes.


Before it's completely dry, carefully peel away your hoop from the plastic, apply more mod podge wherever you feel you might need more reinforcement, and let it dry. Once it's dry, make a small space from the second wrap around, I used the earring hook to make a little gap, and feed the open jump ring through.  Add the earring hook to the jump ring, close it, and you're done!


Pretty cool, isn't it?  You can make it whatever size and color you want.  These pictures don't do it justice, my camera isn't as nice as Nicholette's, but you get the general idea, right?  I hope you like them!
Oh, and these earrings are included in our Earring Week Giveaway!
Read more

Friday, January 8, 2010

Earring Week: More Ribbon Earrings...


These were made the same way as the Ribbon Flower Earrings that I posted a few days ago.
Read more

Thursday, January 7, 2010

Earring Week: Fabric Button Earrings

These button earrings take practically no time and they are so fun! All you need is...

~2 buttons, same size
~scrap fabric of your choice
~hot glue, hot glue gun
~felt, (optional)  .30/sheet
~earring posts $1.79/48
~earring backs $1.79/48
    *Buttons with a rounded back look best.


1. The back, rounded side of the button will be the front. Pull fabric tight around your button to that it all collects at the front of the button. Hot glue it all down.
2. Optional: cut a small round piece of felt to cover the folds on the back of the earring.


3. Then attach the earring post with some hot glue, and you're done!


And if that's not cute enough...

                                               add some ruffles to make them even more fun! Read more

Wednesday, January 6, 2010

Earring Week: Soda bottle earrings


This was a really simple project to reuse those empty soda bottles you have around the house! Here is what you'll need:


- Empty soda bottle
- Wood beads: $2.99 at Michael's (75 pieces)
- Earring hooks: $2.99 at Michael's (60 pieces)
- Jump rings: $2.99 at Michael's (140 pieces)
- Cotton yarn: $2.79 at Michael's
- Crochet hook
- permanent marker to write on plastic


After cutting your bottle up, find the size of earring hoop you'd like to trace, I chose some earrings I already had, and traced it on the plastic.


Cut out the circles, and then cut the inside of your circle, leaving a very thin edge so you can crochet around it.  Don't worry about how exact it is, it'll be covered up anyway.


Go around your plastic circle and do a single stitch crochet to cover up the entire thing.  When you're finished just tie it off.


This is what you'll have, two hoops covered by the crochet around it.


Next, attach the beads to the bottom of your hoop.  Just run your yarn through a stitch, thread your bead and tie a knot so the bead won't slip off.  I doubled my string just to make it a little sturdier.


Once your beads are attached, take a jump ring, thread it to a stitch on top of your hoop, and add your hook to it.  Close the jump ring and you're done.


And there you have it!  Cute earrings made from old soda bottles just sitting around your house!  You can use your imagination and make all kinds of earrings.  I really like the pink one as well, a little bit girly, or the black one gives more of a hippie vibe.


I'm off to make more!
Read more

Tuesday, January 5, 2010

Earring Week: Pearl Strand Earrings


These earrings were simple to make once I figured out exactly how I wanted them to turn out.

Here is what you will need:
8- Fake pearls (I took them from a necklace I don't wear), $.95 (for a TONS)
4" Sheer Ribbon, $.99/2'
Earring Posts (with loops to attach, see pic below) , $1.79/48
Earring Backs, $1.79. 48
Jewelery Wire, $2.99
Hot Glue Gun, Hot Glue, on hand

1. First, I started by threading the wire through the hole in the earring post, then I folded it in half. I strung five of the pearl beads up the two pieces of wire.

2. Then, I folded my 1.5 inch ribbon twice to make my flower more fluffy looking. I made the flower the same way I made the flower earrings in the last tutorial. (Click here to see how).

3. Next, I took one pearl bead and sewed in onto the middle of my ribbon flower.

4. Then, I glued on one pearl on the the earring post.

5. Last, trim the remaining wire from your earrings except for 1/3", and glue that to the back of your ribbon flower!


Read more

Monday, January 4, 2010

Earring Week: Button Jewelery Set


I think this is so adorable! You can find out how to make these cute button earrings at the Craft Tutorials blog! I definitely think the earrings have to be ultra glossy like the ones in the pic to be able to pull this classy look off. But I wanna try this sometime!
Read more

Sunday, January 3, 2010

Earring Week: Ribbon Flower Earrings


I thought of this idea the other night when I was lying in bed thinking about all of my ribbon I got for Christmas. I wanted to make something really cool so this is what I came up with!


They are really easy, this is what you need:

~2 strips of ribbon, about four inches each $1.00/3yds
~Needle and thread, on hand
~2 small cute buttons $1.00/4
~2 earring posts and backs $1.79 for 48 (sale)


I didn't cut my ribbon until after I sewed it just to see how I wanted my flower to look. You sew a couple millimeters from the edge of the ribbon, making 1/2 inch stitches.

*Make sure the last stitch is on the back side of the ribbon so you can tie it off later.


When you have sewed about four inches along, pull the needle and thread tight to create the flower.


Make sure it's pulled taut and a few knots are tied in the back. Then, it should look something like this...

I also put a stitch where the ribbon ends meet to keep them held together.


Then sew your cute little button right smack in the middle of the flower. Run the needle through a few times to be sure that the button won't be falling off any time soon.


And lastly, hot glue your earring post to the back of your flower.


YOU'RE DONE!

Read more

LinkWithin

Related Posts with Thumbnails