Pages
▼
Thursday, December 31, 2009
Get envious of these homemade lightswitch covers!
Check out this simple and inexpensive way to dress up your light switch covers at Design*Sponge!
According to them, all you need is:
-light-switch cover
-pencil
-X-Acto knife
-inexpensive small paint brush
-decoupage glue
-decorative paper
And, I would say most of us have all of that on hand, except for maybe the cute decorative paper. That makes this craft practically *free* !
Wednesday, December 30, 2009
Link Up Parties
Monday: Sew Can Do, Graphics Fairy, Mad In Crafts, It's So Very Cheri, Skip To My Lou, The Girl Creative, DIY Showoff, Making The World Cuter, Sumo's Sweet Stuff, Keeping It Simple, Trendy Treehouse,
Tuesday: Sweet Floweret, Hope Studios,
Wednesday: Sugar Bee, Silly Little Sparrow, Today's Creative Blog, Someday Crafts, The Thrifty Home
Thursday:, Beyond The Picket Fence, Train To Crazy, 733, Shabby Cottage, Fireflies and Jellybeans,
Friday: Somewhat Simple, Thirty Handmade Days, Shabby Nest,
Hodgepodge Friday, Fun To Craft, Tidy Mom, Finding Fabulous, Fingerprints on the Fridge, Simply Sweet Home,
Chic On a Shoe String, Kojo Designs.
Saturday: Show and Tell, I Am Only One Woman, The Hungry Hippo, Funky Junk Interiors, Saturday Spotlight @ Craft Envy.
Baby Beanie!
I saw a beanie like this when I was out shopping one day so I decided to try it out! It turned out to be really easy! All you have to do is crochet a beanie but don't reduce all the way to close it up at the top. Leave a little "tube" and start crocheting up and then start reducing again, but not as quickly. I crocheted about five rows and then reduced by just one. Crochet five rows, reduce by one, crochet five rows without reducing again, reduce by one again, etc. If that doesn't make sense send me an email and I can give more detailed instructions!
Nicholette
Nicholette
Tuesday, December 29, 2009
Jeweled Frames...so eNVious...
I found this brilliant idea at Ruffles & Stuff to make the most adorable frames ever! You just take a boring old frame and put those flat marbles on them with a little embellishment, like a bow or a flower and voila! Oh, and PS, I have seen those flat marbles at the dollar store before so I think you could totally make this into a dollar store craft. $1 frame, $1 bag of flat marbles, $1 embellishment!
Monday, December 28, 2009
Baby's First Christmas Ornament!
This is a very simple project, anyone can do it! The whole thing was around three dollars with tax. This is what you will need, and how much I paid...
2 spools- 1/4 to 1/2 inch width ribbon .47 ea.
Hot glue gun, 1 stick of glue .10
2- 2x3 peices of glass ( size of your choice) 2.00
1- printout of the side of your baby's face (needs to fit inside the glass)
1- printout of baby's first and middle name
1- printout that says "Baby's First Christmas"
scrapbook paper for the background .50
Glue stick (just a tiny bit)
I went to the dollar store and chose 2x3 frames and just took out the glass. Be sure the clean off the class with some window cleaner before you preserve your fingerprints inside the ornament forever!
For the silhouette of the baby, I just printed mine out after I got it sized right. Then I flipped it over so the white side was face up, and put a little acrylic white paint over it so the dark ink on the other side didn't show through.
Then I printed and cut out my baby's name and stuck it to a brown background with a glue stick. Then you just glue the silhouette and the name to a background color of your choice...
I chose green.
The back of the ornament will say "Baby's First Christmas" which I just typed up and printed out. I put a little criss-cross background behind it and stuck it on to my green scrapbook paper with a glue stick.
Next, you take your two pieces of clean glass and place the paper in between them.
Then you're going to take the ribbon of your choice and begin hot gluing it around the edges of the glass to hold it all together.
So it will look something like this...
Then I took two colors of ribbon, about two feet long and folding them in half so they were a foot long. I glued the fold to the top of the ornament and tied a bow so that it can hung on my tree!
Simple, yet elegant!
-Nicholette
Sunday, December 27, 2009
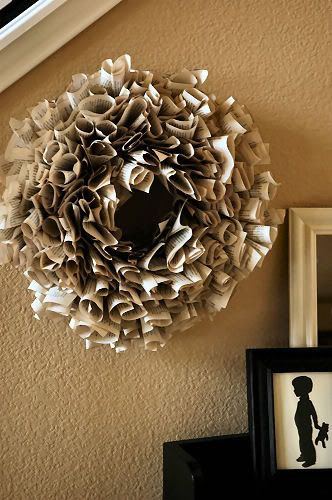
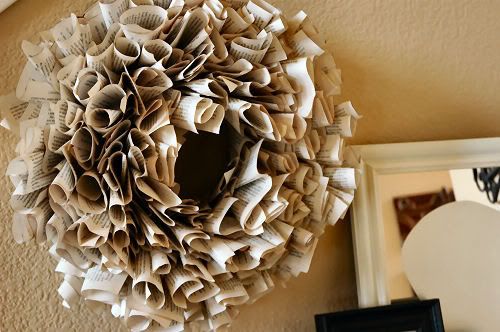
I am SOOOO envious of this wreath!!!
I really cannot stop thinking about this wonderful wreath created by Living with Lindsay. I love it so much, and I can't wait to make myself a couple to put over my fireplace.
Isn't it the most clever idea? It's made out of book pages. I love it!
She has a wonderful tutorial on her blog, you should check it out! I'll post a picture of mine when I finally get around to it. And I will get around to it, believe me!
--Vanessa--
About Us
Nicholette
A few things you may or may not care to know:
~Besides crafting, I love to cook. My family is all about food, when we get together, we cook amazing things and PIG OUT. ~I love to play basketball.
~I live for Diet Cherry Pepsi. I drink it more than I drink water, which means I need a rude awakening before I die of cancer from artificial sweeteners.
~This one time, I peed my pants up in a tree for three dollars. I don't regret it. It was funny.
~I like to sit with my feet up on my chair. Must be Restless Leg Syndrome.
~If I could choose an actor to play me in a movie it would be Jack Black in a wig with a semi-high pitched voice.
~Pet peeve: people that interrupt you when you're talking to talk to someone else.
~I think In n' Out is gross. Fries should never taste like hot cardboard.
Contact Me
Feel free to email me about anything!
My email address is:
nv.craftenvy@gmail.com
Thanks,
Nicholette
Tutorials
Firetruck Themed Birthday Party
Framed Paper Family Tree
Yellow and Gray Initial Wreath
Baby Crocheted Barefoot Sandals
Healthy Popcorn Recipe for the Dieter!
Dandelion Stenciled Dresser
Father's Day Framed Handprints
Framed Nautical Decor
Tie Snake
"I Am A Child Of God" Sign
Felt Quiet Book
Foam Board Bedroom Sign
Above Cabinet Decor
Girl's First Birthday Party
Classic Pooh Baby Shower
Pina Colada Smoothie Recipe
Framed Valentine's Girlfriend Gift
Homemade Valentines
Birdies and Bows Baby Shower Theme
Yarn Valentine's Day Wreath
DIY Mail Organizer
SLC Wood Temple Block
$1 DIY Men's Jewelery Valet
Neighbor Gifts: Homemade Caramel
DIY Napkin Rings
Family Birthday Calendar
Modern Cornucopia
Halloween Party Ideas
Sweetened Condensed Milk Caramel Recipe
Fall Block Tutorial
Fall Pumpkin Wreath
Homemade Sun-dried Tomatoes
Accent Gem Rings
Newspaper Nail Tutorial
House Cleaning Schedule Cards
Boardwalk Picture Frame
Beaded Binky Clip Tutorial
DIY 3D Wall Flowers
Disney Cars Birthday Party
Tux and Tie Freezer Paper Onesies
Fleece Dahlia Pillow
Ribbon Binky Clip Tutorial
Paper Rose Bouquet
"To Return" Box
Rolled Taco Recipe
Scrapbook Paper Wreath
BFF Onesies
Baby Food Jar Spice Containers
Ice Cream Cake Tutorial
Sweet and Spicy Pizza
DIY Planner: Franklin Covey
Earring to Necklace Tutorial
Silhouette Rhinestone Onesie
Easter Basket Fondant Cake
Microwave Caramel Recipe
Baby's Book of Faces
Tulle Pomander Tutorial
Tissue Paper Rose Pomander
Lavender Nursery
Vanity Redo and Curling Iron Holder
Personalized Lighted Mirror
Ultrasound Thank You Cards
Valentines Yarn Wreath
Crochet Hairclip/Brooch
DIY Earring Holder
DIY Toddler/Baby Tie Rack
Hair Bow Holder
Baby Tie Skirt
Felt Hair Flowers
Crocs Refashioned
Freezer Paper Stenciling
Matching Tie and Hairbow
Crochet Fashion Beanie
Baby/Toddler Tie
Reversible Car Seat Cover
Framed Silhouette Hearts
Inexpensive DIY Necklace Holder
Fall Leaves Craft
Trick or Treat Container
Happy Haunting Framed Decor
Handmade Gift Box
THE BEST Hot Wings!
Thumbprint Height Board
Spice Containers: Baby Food Jars
Painted Tree Branch: Wall Mural
Bride and Groom Strawberries
Fabric Flower Wreath
Monogram and Metal Wreath
Dainty Little Apron
Handprint Thank You Cards
Comic Strip Bracelet
How To Stain A Table
How To Throw A Pirate Party
Pirate Bedroom Makeover
Eagle T-Shirt
Love Block
Furoshiki Bag
Painted Kitchen
Crochet Flower Decor
Singed Flowers
Recipe Holder
DIY Beaded Watches
Pirate Wall Art
Living Room Makeover
Wall Art
DIY Stencil Monogram
Checkered Coffee Table
Pirate Bedroom Sign
Photo Art Letters
Ribbon and Pearl Bracelet
Fabric Flower Shoes
Security Envelope Formula Cans
T-Shirt Headband
DIY Fondant
Ceramic Coasters
Skewer Candle Holder
Diaper Cake
Fabric Covered Shoes
Mouse Trap Notepad
Spring Stone Wreath
Spring Flower Shirt
Granny to Gorgeous Shoes
Fabric Flower Necklace
Crocheted Headband
Pirate Clock
Newspaper Decoupaged Organizers
Felt Roses
RL Dress Makeover
Fabric Kanzashi Flowers
Felt Quiet Book
Newspaper Covered Frame
Layered Button Bracelet
Business Card Holder
Felt Car Booties
Ribbon and Pearl Ruffle Necklace
Tie Headband
Scarf From Crocheted Flower Pattern
Egg Shell Picture Frame
Shabby Tie Onesie
Cardboard Decorative Letters
Baby's First Christmas Ornament
Curly Whirly Scarf
iPod Nano Cozy
Baby Beanie
String Earrings
Fabric Button Earrings
Soda Bottle Earrings
Pearl Strand Earrings
Ribbon Flower Earrings
Ribbon Hair Flowers
Vellum Covered Picture
Rosette Picture Frame
Hair Flowers
Saturday, December 26, 2009
Advertise
I am currently offering an advertising rate of $5/month with a 6 month minimum contract!
Please contact me at nv.craftenvy@gmail.com if you are interested or have any questions!